


Hello Green Click for WooCommerce
1. Install Plug-in
There are two ways to download the ‘Hello Green Click’ plug-in: directly via our website or via the WordPress plug-in store.
Automatic installation
via WordPress plug-in directoryYou can install the plug-in directly via your WordPress admin area.
To do this, go to your WordPress dashboard and proceed as follows:
- Navigate to “Plug-ins” in the left-hand menu bar.
- Click on the sub-item “Add new plug-in“.
- Now enter “Hello Green Click” in the search bar.
- As soon as the plug-in is displayed, click on “Install now”.
- Finally, click on “Activate”. The plug-in is now ready for use.
Manual installation
Download from our websiteYou can easily install the plug-in manually.
Proceed as follows:
- Download the plug-in here.
- Navigate to “Plug-ins” in the left-hand menu bar.
- Click on the sub-item “Add new plug-in“.
- Then click on “Upload plug-in”.
- Select the downloaded file and click on “Install now”. The plug-in will now be uploaded to your WordPress system.
As soon as the plug-in has been uploaded, an option to activate it will appear. Simply click on “Activate”.

2. Log in to Hello Green Click
After downloading the plug-in, the next step is to register with Hello Green Click. This process is crucial to generate your personal API key, which is required to activate and use the plug-in.
3. Configure your Plug-in
Now that you have downloaded your plug-in and generated your API key, it’s time to set up the plug-in in your store system. The process is straightforward and quick.
If you need help, our support team is always available to guide you through the process step by step.
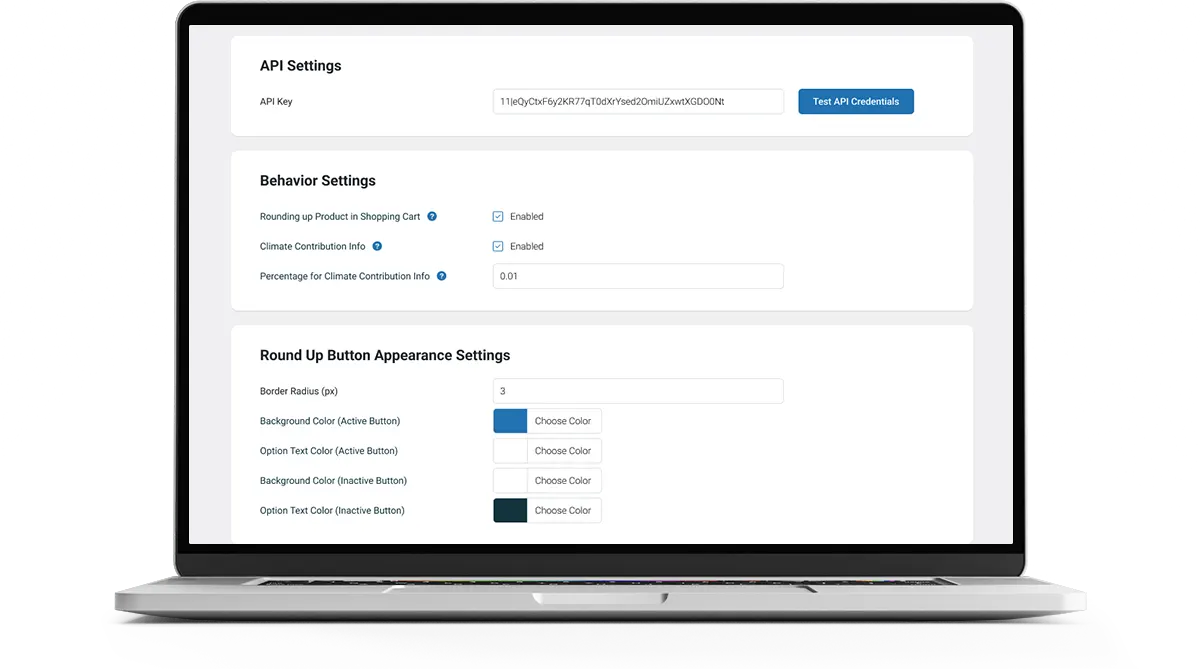
API Settings
Create and store API Key
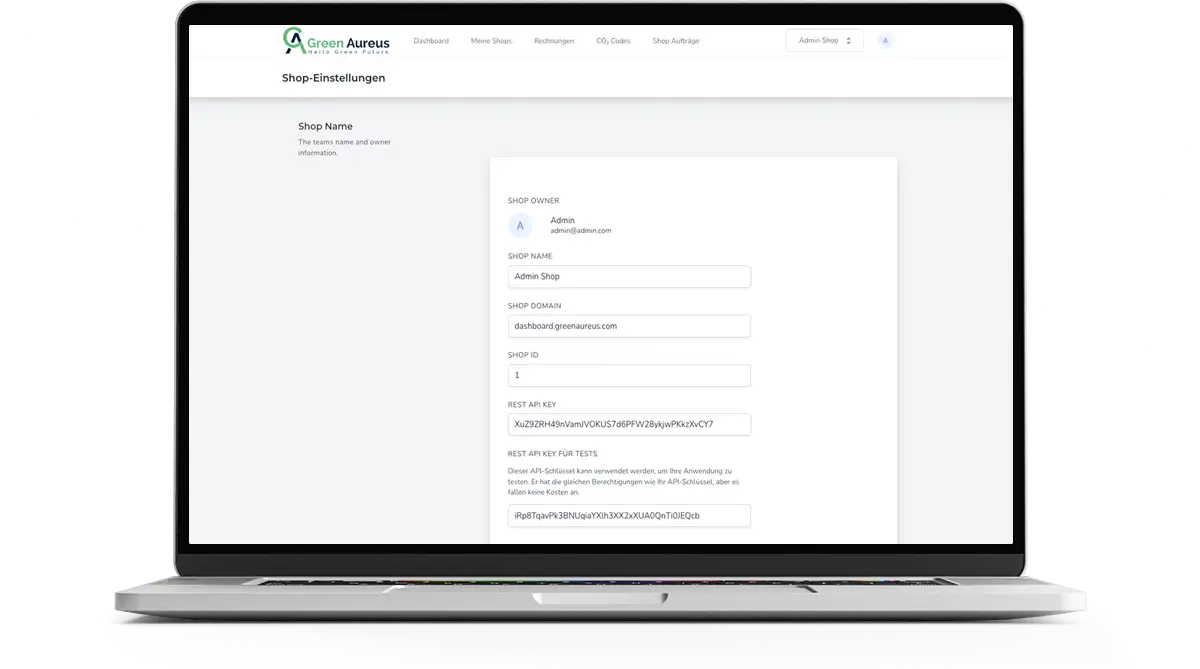
- Log in to Hello Green Friends
- Click on Shop selection in the top right-hand corner of the main menu and then Shop settings. In this area, you have the option to personalize the internal names of your store. You will also receive two API keys: the first key is intended for regular operation, while the second key, the test key, should be used for setting up new stores or test purposes.
- Copy the desired API key and paste it into the “API settings” section in the plug-in settings
- Test the “API Credentials”
Behavior Settings
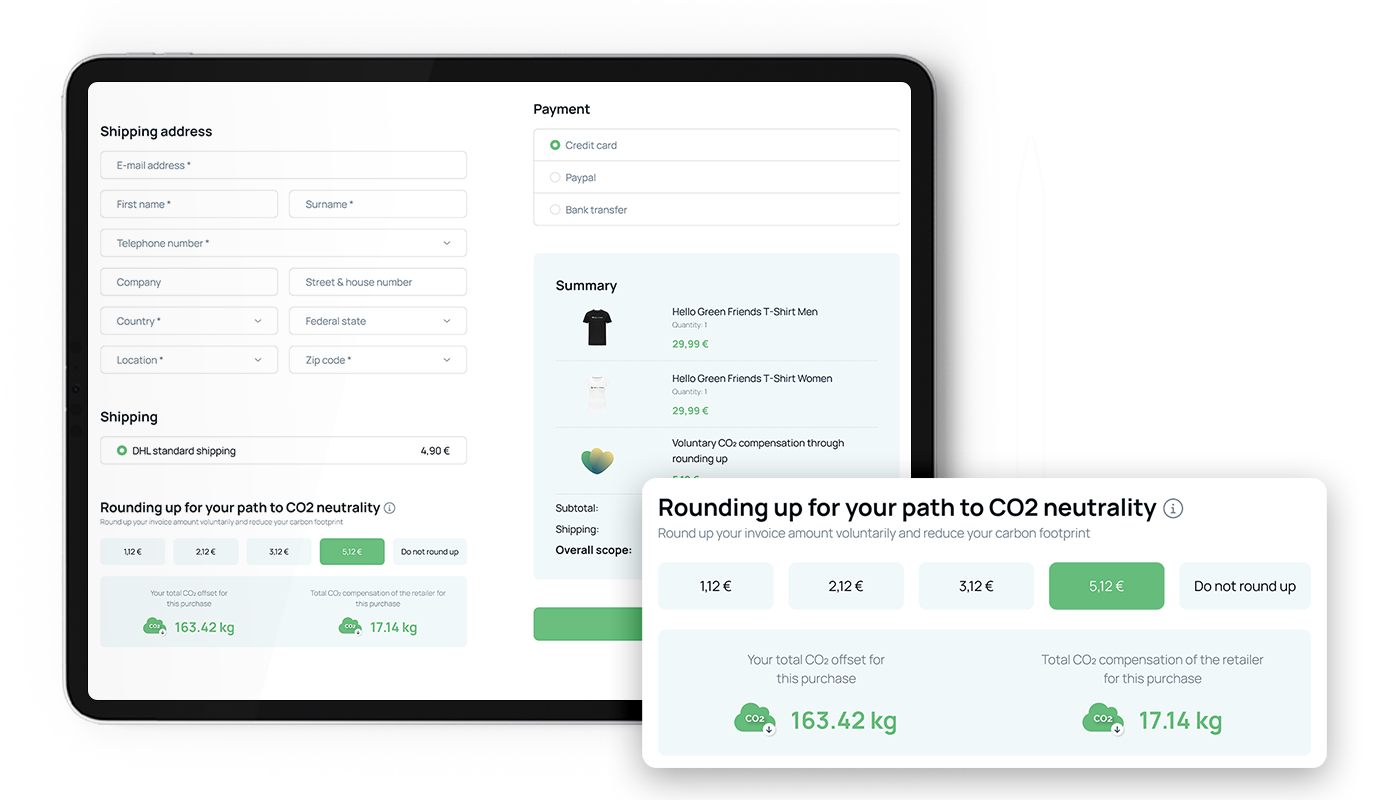
Rounding up the Invoice Amount in the Shopping Cart
The function allows customers to voluntarily round up their invoice amount in the shopping cart to offset their ecological footprint. The selected rounding amount is added as a separate product in the shopping cart.
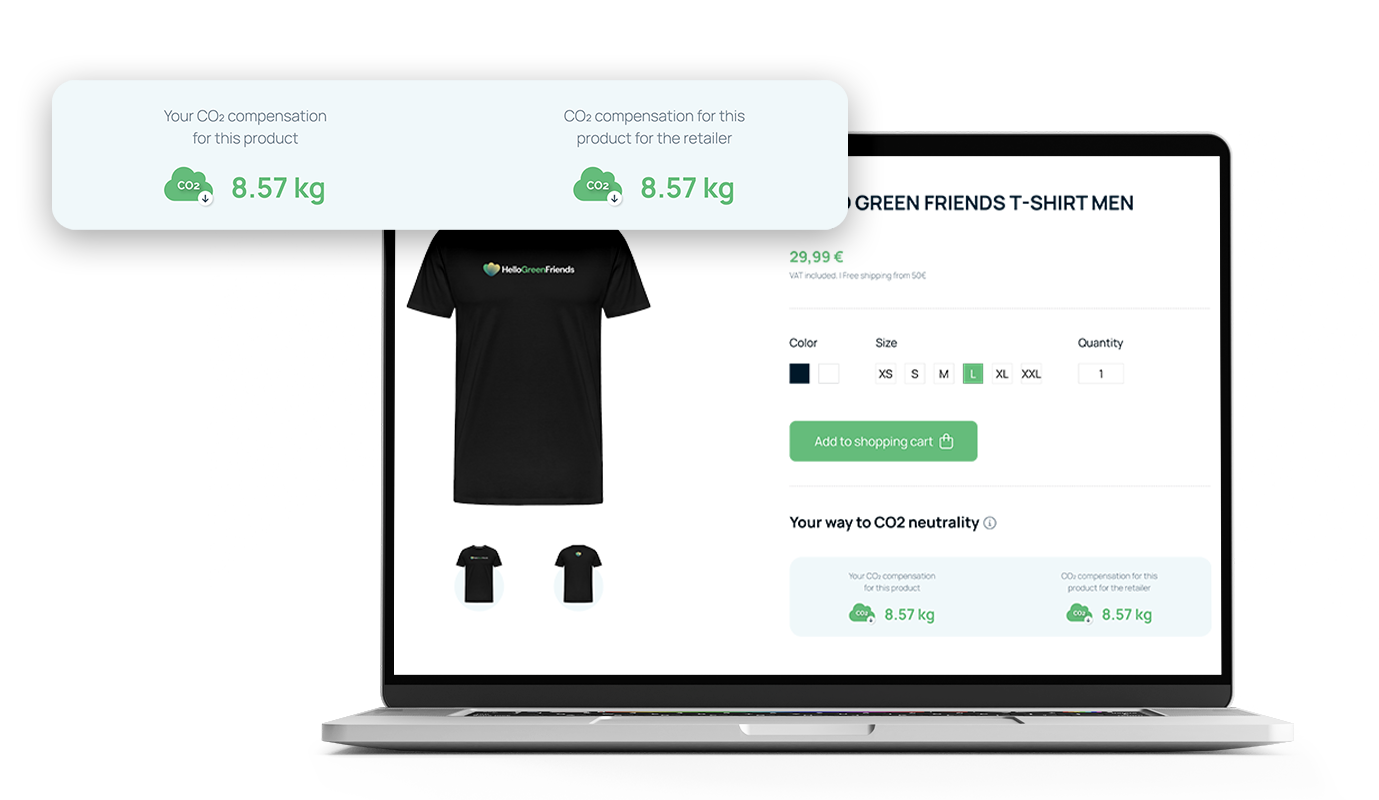
Automatic CO₂ Compensation
This function enables store operators to determine a freely selectable percentage of the sales price of a product for CO₂ credits that benefit both the buyer and the store operator. When activated, customers are shown directly on the product how much their purchase contributes to carbon offsetting.
Percentage Rate for Automatic CO₂ Compensation
This value is required for the calculation of the automatic CO₂ compensation, which is based on the product value.
Round Up Button Appearance Settings
Rounded Corners (px)
This setting allows you to elegantly round off the corners of your ‘Round up’ button. Select the degree of rounding in pixels to customize the appearance of the button to your liking.
Background Color (Active Button)
Adjust the background color of the active button to make it stand out visually. Choose a color that both matches your design and draws attention to the button.
Text Color (Active Button)
Here you can change the color of the text on the active button. Choose a color that harmonizes well with the background color and ensures clear legibility.
Background color (Inactive button)
This option allows you to adjust the background color of the inactive button. Choose a color that stands out discreetly from the active button, but still fits into the overall picture.
Text color (inactive button)
Here you can change the text color of the inactive button. A well-chosen color ensures that the text on the inactive button remains easy to read.
Carbon Offsetting Block Appearance Settings
Loader Circle Color
Customize the color of the circular charging indicator to visually integrate it into your design. Choose a color that is both eye-catching and matches your overall look.
Border Radius (px)
With this setting, you can elegantly round off the corners of your “CO₂ Compensation Block”. Select the degree of rounding in pixels to customize the appearance of the block to your liking.
Border Width (px)
Specify the width of the frame of your “CO₂ compensation block” here. Adjusting the border width can enhance the visual presence of the block on your page or make it more subtle.
Border Color
Change the color of the frame to make the “CO₂ compensation block” stand out visually from other elements of your website or to integrate it harmoniously.
Background Color
Adjust the background color of the “CO₂ compensation block” to achieve a coherent look. Choose a color that highlights the block or blends seamlessly into the page layout.
Title Color
Here you can adjust the color of the title in the “CO₂ compensation block”. A well-chosen title color increases readability and draws attention to the block.
Text Color
Change the color of the text in the “CO₂ compensation block” to ensure pleasant readability. Choose a color that harmonizes well with the background color.
Do you have any Questions?
We are here to help you! If you have any questions, need support or just want to give feedback on our plug-in, don’t hesitate to contact us. We will be happy to help you.
FAQ
What is the e-commerce plugin?
The Green Aureus e-commerce plugin is a tool that helps companies decarbonize their online store and turn climate protection into business growth. It provides a blockchain-based solution that gives consumers access to verifiable and tamper-proof information about a company’s sustainability efforts.
How does the e-commerce plugin work?
The plugin offers two main functions. First, a program for store operators where a certain percentage of the purchase price is used for carbon credits. This percentage is included in the purchase price and half is credited to the customer’s account and half to the store owner’s carbon account. Secondly, customers have the option to round up their invoice amount at checkout to offset their carbon footprint. The rounded up amount is used to purchase carbon credits, 100% of which are credited to the customer’s account.
What advantages does the e-commerce plugin offer?
The plugin helps companies to position themselves as green pioneers and gain a competitive advantage. It enables companies to respond to customers’ increasing awareness of sustainability, win more customers and increase their sales.
How can I implement the e-commerce plugin in my online store?
To implement the e-commerce plugin in your online store, you can contact Green Aureus directly via their website. The Green Aureus team offers support with the implementation and use of the plugin.
How can customers verify that my sustainability efforts are genuine?
The e-commerce plugin provides a blockchain-based solution that gives consumers access to verifiable and tamper-proof information about your sustainability efforts. Customers can see the carbon offset performed on their invoice and verify it using a carbon offset code.